
Setting up a cybersecurity testing lab is the first step for any aspiring ethical hacker or malware analyst. However, relying on default virtual networking settings can potentially expose your physical computer (the host machine) to unnecessary risks. If malware behaves unexpectedly or escapes the virtual environment, it could potentially spread to your host machine or local network.
To achieve strong host isolation without cutting off your tools from critical software updates, you need a hybrid network architecture. In this guide, we will configure a secure, air-gapped hacking lab in VirtualBox by combining NAT and Internal Network modes step-by-step.
In this guide, we will show you how to create an isolated VirtualBox lab with Kali Linux and Windows while keeping internet access.
Secure VirtualBox Lab Network Setup
To guarantee that your lab traffic never leaks into your physical household network, we must split our virtual machines into two distinct operational roles:
The Attacker (Kali Linux): This machine requires temporary internet access to update tools (apt update). However, it must also connect to a private virtual network to scan the target. We achieve this using Dual Network Adapters.
The Target (Windows/Victim): This machine must remain completely isolated from the internet and your host OS. It resides strictly inside a closed sandbox.
Configure Kali Linux Network Adapters
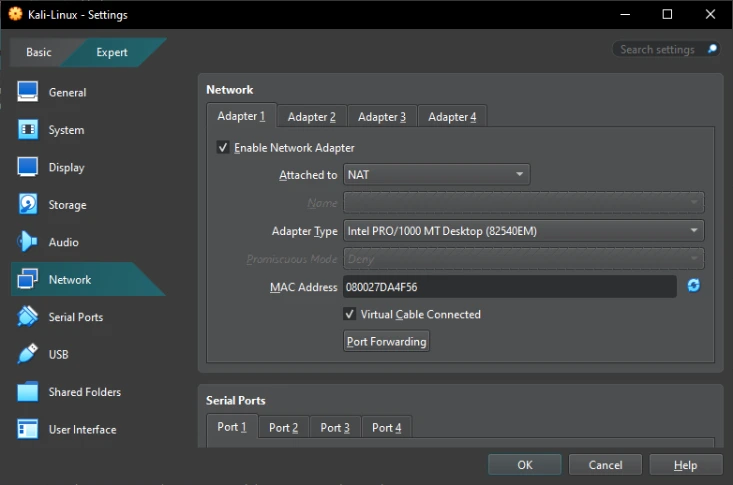
First, we will configure your Kali Linux virtual machine network settings to split its connectivity. Open your VirtualBox manager, select your Kali Linux VM, and click on Settings -> Network.
1. Adapter 1 (Secure Internet Outbound)
Enable this adapter and set it to NAT. Standard NAT mode allows the guest OS to download tools and security patches while providing outbound internet access and limiting direct inbound connections from the external network.
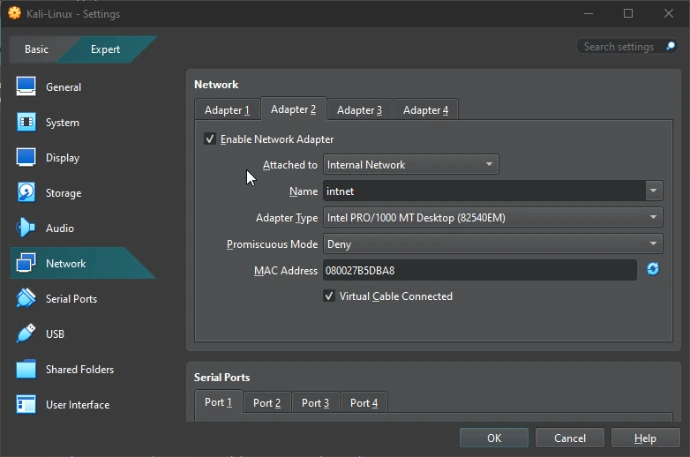
2. Adapter 2 (The Isolated Switch)
Switch to the Adapter 2 tab, check Enable Network Adapter, and change the Attached to option to Internal Network. Keep the default network name as intnet. This acts as a completely isolated virtual switch.
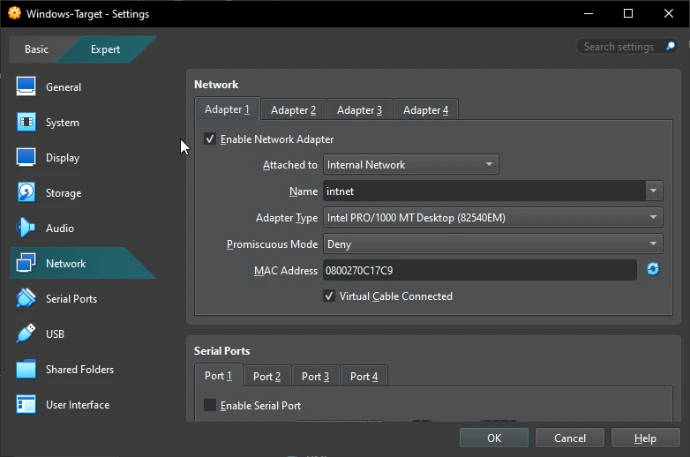
Configure Windows Target Isolation
Next, we must completely seal the target environment so that no traffic can escape. Open your Windows-Target VM settings, head to the Network tab, and configure Adapter 1 to use Internal Network with the exact same network name: intnet.
Note: Ensure all other adapter tabs (Adapter 2, 3, etc.) are disabled. This forces the target machine to communicate ONLY with Kali Linux, keeping it safely blocked from the internet and your real home network.
Assign Static IP Addresses
Because an Internal Network acts as a completely unmanaged switch, VirtualBox Internal Network does not provide DHCP by default, so you must configure static IP addresses inside both operating systems:
Kali Linux (Internal Interface): Open your network manager and assign a static IP of 192.168.100.5 with a subnet mask of 255.255.255.0.
Windows Target: Open the IPv4 settings of your network adapter and assign a static IP of 192.168.100.10 with a subnet mask of 255.255.255.0.
Test the Isolated Lab
Once saved, open a terminal on your Kali Linux machine and type: ping 192.168.100.10
If you receive successful replies, your penetration testing lab is now running inside an isolated virtual environment.